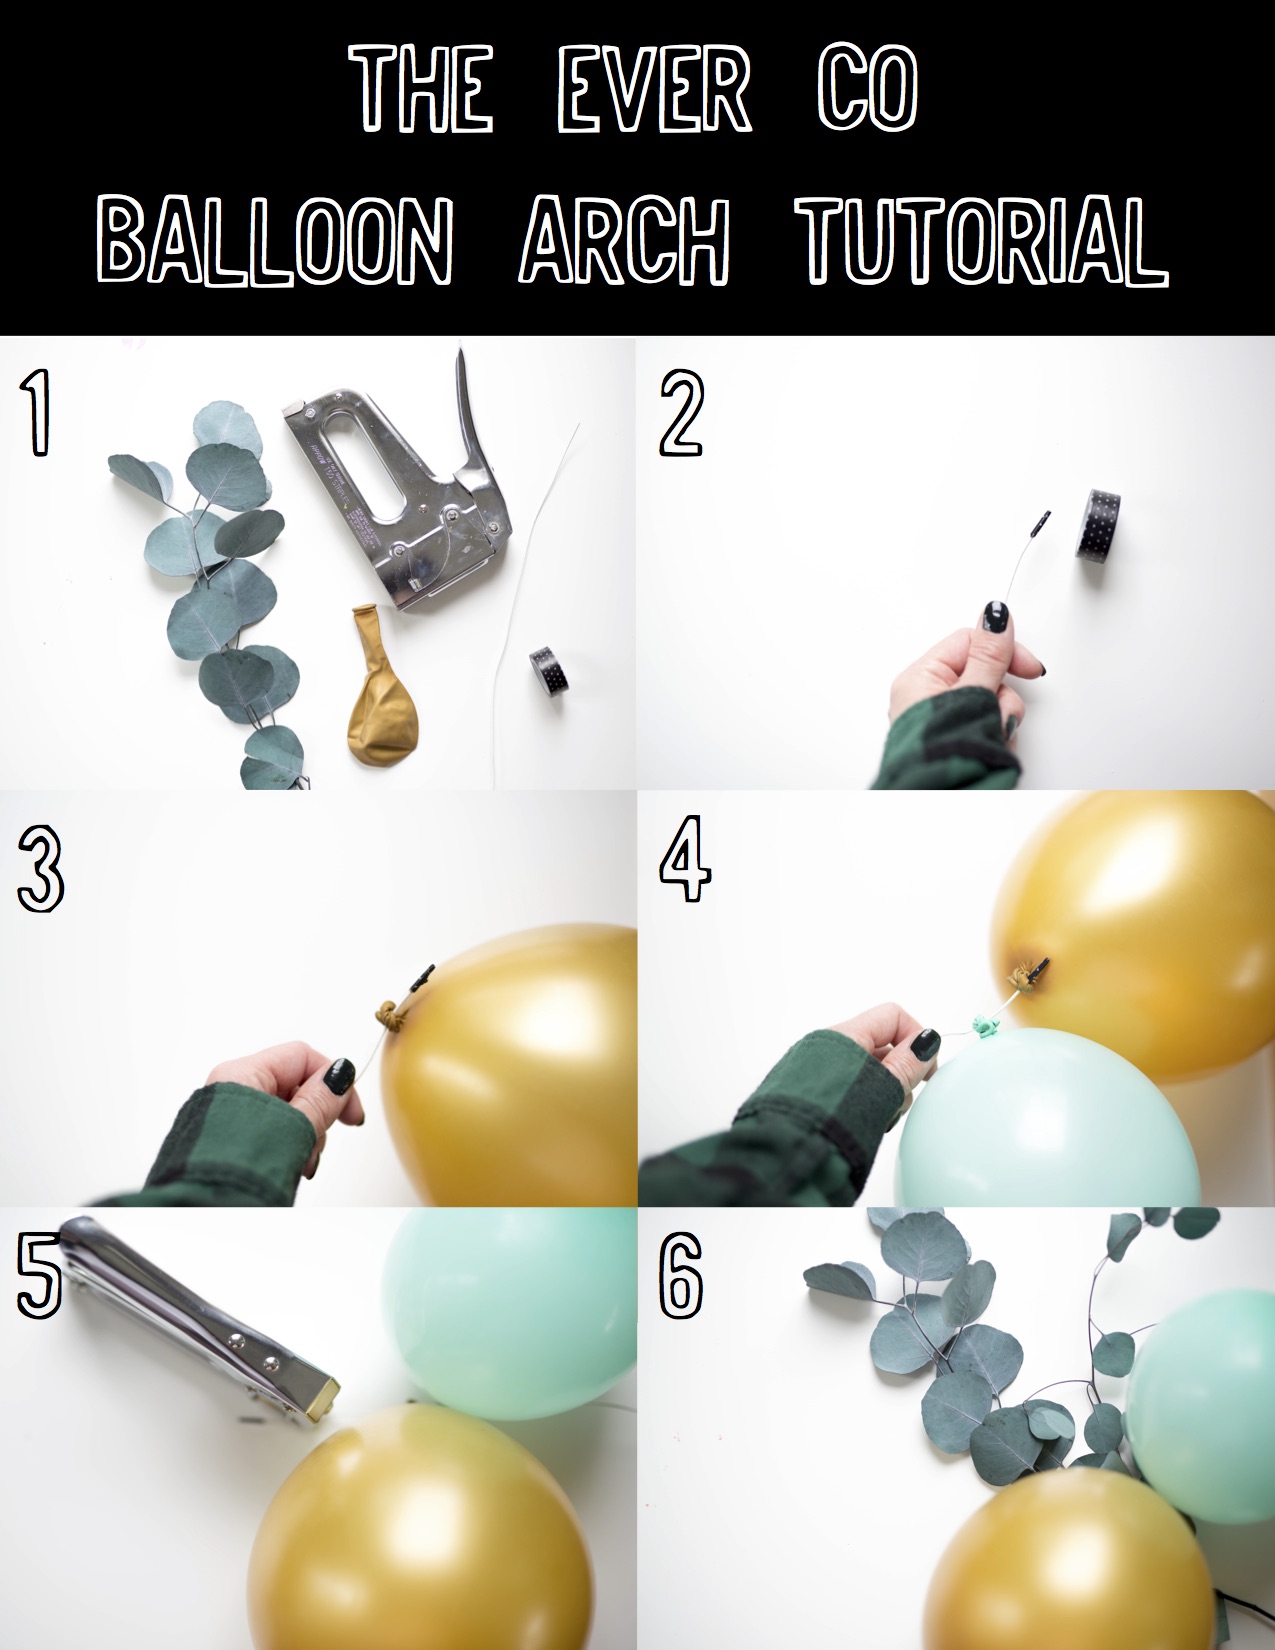
HALLOWEEN COSTUME ROUNDUP

costumes halloween.png
 

It’s finally here! Our Halloween costume roundup! This is great for anyone needing to throw together a last minute family costume, and even great for those planners who are ALREADY dreaming of next year’s family costumes! (me - haha!)

I hope you find something that catches your eye, and I also hope you are able to pay a visit to so many of these wonderful families who have put together the cutest, most clever, silliest and pretties costumes EVER!

We are honored to be able to feature them here, and be sure to pin this image below to your pinterest board for easy reference for years to come!

We can’t wait to see what you dream up this year! (Be sure to tag us so we don’t miss it!)


Below you will find a collection of curated halloween costume images, collected from Instagram. Each owner of the image is tagged below their picture, and you can visit their profile for more details on the costume!

I chose to feature costumes that were mostly DIYs, as we want these to be fun to make and create, and we always love that with DIYs you can add your own personal touch!

I’ll start with our own family costumes from the last few years. You can find all of these on my personal page @amylouhawthorne. They were so fun to make!


The Golden Girls by @theblushingbluebird


UP by @elsabowman


Be sure to pin this image to pinterest for years to come so you have an easy reference for future Halloween costumes!

I hope you loved seeing these as much as I loved curating them!

Now, let’s get to creating!

XX, Amy

PLAYROOM FAVORITES


I have to admit that one of my all time favorite rooms in the house is the girls’ playroom.

I love that the room is surrounded by windows and there’s always so much natural light for the girls to play.

We’ve also loved that the playroom is now on our bottom floor! This allows the girls to play while mama cleans and makes dinner and it’s simply a win all around!

I always get so many questions on their playroom, so I am sharing the first half of their playroom here! I will soon blog the other side as well as a “playroom inspiration” post, because there is TONS of playroom inspo all over pinterest! You can check out my “kiddos” board here which has so much inspiration!

So here she is! The girls’ shared playroom!


A few notes before we get to some links below!

  • The hubs built these shelves!!! And guess what? We did a blog tutorial that you can read HERE! You can also see what they looked like in their old playroom. I truly do miss them in that spot, BUT the location now is so much more practical!

  • I always get tons of questions about the girls baskets! The sources are all answered below! But along with that, I always get asked what’s in them! So here’s a list from top left to bottom right:

    • DVDs, remotes, dog toys, Gathre washable play mats, play food for kitchen, play appliances for kitchen, baby dolls, blankets, building blocks and tiles, dinosaur toys and cars.

  • I linked a smaller kitchen below, but here is the link to our corner play kitchen here! It would be such a great Christmas present for your kiddos!!! Fair warning, it took us 3 hours to put together BUT IT WAS SO WORTH IT!!!! It’s the most used toy in our house! Couldn’t recommend it anymore! (I shared about how we painted all of the hardware below!) The girls are 4 and 2 and both equally love it!

  • I’ve thrifted a ton of their kitchen appliances/ flatware and it’s my biggest tip! You can find the cutest items for the play kitchen at thrift stores!

  • The kitchen wooden retro style play food IS FINALLY back in stock!!! You can shop that here for the first set and here for the second!

  • The girls aprons are from one of our absolute best friends Haley of Indy and Pippa Co!!! She is releasing some tonight but be sure you’re following her here to get updates should they sell out!!!

  • Finally, the weaving you see above the kitchen was a DIY! You can find my tutorial here, but an even better video tutorial is available in my “DIY highlights” icon on my personal instagram page here!


I’ll share links below for some of my all time favorite playroom items! If there’s anything you see that isn’t linked, please let me know!!! As always, you can click on the name of the item and it will take you to the direct link for the item!

  1. WOODEN PLAY MIXER - The girls use this SO much and love that it’s just like mama’s big mixer! They "mix cakes and cupcakes” all the time!

  2. STEP STOOL - The best and cutest little stool for really any room in the house, but it works great as a little side table / stool in the girls room. They also have one in their bedroom as a nightstand!

  3. BABY DOLL STROLLER - Not gonna lie, we may need to get the girls another one of these cause they fight over the one we have! ha! But it’s cause they just love it so stinkin much. The quality is incredible!

  4. PLAY TABLE - We’ve had this for 4 years and it’s a favorite! So durable but also super light! I just painted the bottoms of the legs of ours pink to go with our decor more!

  5. BELLY BASKET WITH POMS - We clearly have a thing for rattan and belly baskets. I hope they never go out of style, cause if so…I’m in trouble hehe! We typically get all of our bigger baskets from Home Goods, TJ Maxx and Marshalls, but ALL of our smaller baskets are from our favorite belly basket shop We Are Broots!

  6. PLAY KITCHENETTE - I linked a smaller version here but above I linked the one we have! Either one is amazing if you redo all of the “hardware!” All you have to do (BEFORE YOU PUT IT TOGETHER) is spray paint all of the pieces! We used normal rustoleum spray paint from Home Depot or Lowes and we highly suggest using a rose gold or copper! It makes the kitchen look so modern and we love it! To dry, we put wire hangers in the pieces to hang them up to ensure they’d have a smooth finish! (pro tip thanks to the handy hubs).

  7. WASHABLE RUG - Our newest piece finally arrived and it is INCREDIBLE!!! Guys, I’ve been wanting a rug in here that didn’t get too dirty but that was still cute and matched the decor AND I FOUND IT! This Lorena Canals rug is MACHINE WASHABLE!!!! We can literally pick it up and throw it in the wash whenever we want! SOLD!!! and the price point is SO reasonable! Can’t beat that.

  8. HIPPO ROCKER - I have the pink piggy rocker, but sadly they are sold out! I equally love this hippo rocker just as much and the girls seriously love going on “piggy rides” on theirs!

  9. WOODEN PLAY COFFEE MACHINE - My favorite kitchen appliance, and the girls too. They make me morning coffee and it’s truly the cutest thing ever! We love this play coffee machine!!!


I hope that answered any questions you may have! But if it didn’t, be sure you send me a message on my instagram so I can get back to you quickest!

Hugs and happy playing!

XX, Amy

FALL BUCKET LIST

It's finally here! My favorite blog post of the year : Fall (Halloween) Bucket List!

We go into full Fall mode on September 1st here to squeeze every bit out of this magical time of year that we can! From pumpkin painting to roasting pumpkin seeds to decorating your front porch with fresh pumpkins and mums, here you'll find a mixture of everything to help you celebrate every day like it's a holiday. 

So grab a cup of PSL (pumpkin spice latte), a hot cup of tea or some warm apple cider, cozy up with your favorite flannel throw, light a fall scented candle and join me as we look into a season full of bucket list adventures! 

You can download the bucket list here to print it out at home (or blow it up at an office store)! Then you can laminate it and mark items off the list as you make memories this fall. 


Create magical costumes via Becky Kimball


Winterize your garden via Makelle Ahlin


Watch spooky movies (Hocus Pocus is a fave!) via Jessica Garvin


Collect new mums via Katie Westphal


Make ghost pretzels via Kendra Henderson


Hay ride adventures via Caitlin Teal


Pumpkin carving sink baths via Melissa Brookes


Halloween coloring via Katie Prouty


Homemade cinnamon rolls via Caitie Newms


Dreamiest porch ever via Kindred Vintage


Searching for unique pumpkins via Kayla Sampson


Pumpkin patch adventures via Celeste Wright


County fair cuteness via Sarah Schneider


Pumpkin painting via Brittney McNutt


Pumpkin carving and display goals via Jessie Pennington


Farmers market fresh flowers via Liz Marie Galvin


Camping and glamping adventures via Sarah Schneider


Sweetest pumpkin painting via Amanda Rydell


Pumpkin seed picking and roasting via Amy Hawthorne 


Mum picking adventures via The Shine Project


Paper bat decorating perfection via Jessica Garvin


Outdoor movie night adventures via Between You and Me Signs


Butternut squash soup making via Amy Hawthorne


Spooky book reading via Stephanie Kursar


Spider web magic via Jessica Garvin


Perfect pumpkin finds via The Vintage Exchange


Simple fall decor via Hooray Everyday


Yummy spooky brittle via Albionfit


Family pumpkin carving via House of Lu


Spookiest pretty porch display via Urban Outfitters


Trick or Treating adventures via Cassidy Compton


Gorgeous apple pie via Casey Wiegand


Yummiest pumpkin pie via Heid Matson


Spooky books and Halloween jammies via Sarah Anderson


Leaf jumping adventures via Elsie Larson 


BOO cookie cutters via Raven Vasquez


Sweetest Halloween jammies cuddles via Calli Fox


Ghost pretzels via Stephanie


Fall wardrobe goals via Jessica Oakes


Pumpkin spice latte bliss via Jessica Garvin


Remember always, that as much as we want you to make memories and celebrate life with those you love most, never accept quantity over quality. Make the memories you make count. Chase after the quality of each adventure versus the quantity of adventures you create. So if you finish all 50 of these or just 2, make them count.

xoxo, Amy

EASY DIY FAUX WEAVING

I've had this awkward space above our living room TV (which mind you sits at an awkward angle cause Blake insisted on there being NO glare on our tv from the window-insert eye rolling emoji here, ha!) that I've been searching for the perfect piece for! We had a West Elm faux taxidermy giant deer head up there, but I'm kinda out of the animal head phase if I'm being honest. 

So, I decided to dig up my rusty craft supplies and get to work!

I knew this way I'd be able to create the perfect sized piece with just the right amount of boho!

I began looking online at different DIY faux weaving tutorials cause I was not excited to build a weaving kit and spend days working on a weaving project. Luckily, I stumbled across the BEST tutorial from A Beautiful Mess, and I just tweaked their tutorial a bit to come up with my own! 


And guess what?!?!? I had EVERYTHING in my home already, spent a total of 3 HOURS making it, used about $20 of craft supplies and never left the comfort of my living room! The best part about this tutorial is you can literally customize the size, color and texture to fit any space in your home that needs a little update! 

(sorry in advance for the horrible lighting in the pics. I am soooo impatient and had to do this at night time when the girls were asleep!)


STEP 1 : GATHER SUPPLIES. 

  • yarn for tassels (I have sooo much yarn in my craft room and I just grabbed the colors I knew I wanted to use to match our living room, which is generally neutral with a touch of pink). I also suggest using the thick chunky yarn cause it looks very chic, has a more "store bought" look, it's cozy AND it's easier to do cause it's so thick! It also adds so much texture!

  • small felt balls or a thick yarn that can be placed to look like weaving at the top of the piece (they used felt ball garlands in the A Beautiful Mess tutorial, but I just used a chunky yarn)

  • a rug (like in their tutorial) or anything that's a solid color that has some firmness to it to act as the backdrop. You can also use a latch hook mat if you'd rather tie than use hot glue guns. I actually used a hard piece of particle board for mine cause it was the perfect size!

  • wooden dowel rod (like they used) or I LOVE using copper rods from Home Depot or Lowes! I love the mid century modern look the copper gives! Also some string or wire to hang the weaving.

  • hot glue, glue gun, scissors

  • wall anchor or a pretty hook (I got ours from Hobby Lobby and love that it adds some dimension)!

Here's our sweet Bella who would NOT get off the comfy yarn hahaha! 


STEP 2 : MAKE TASSELS.

For the size of my art, which was roughly 3 feet x 2 feet, I made about 40 tassels, but remember I also used very chunky thick yarn. For thinner yarns with less volume, you'll likely need upwards of 70 tassels. This also depends on how big you want your piece.

The tassels are the most time consuming part, but even so it only took me about 2 hours to make! I just binged Netflix with the hubs and listened to him make fun of me for spending so much time making "shag rugs for the wall." ahhahah! We had a blast lol. 

You can see the A Beautiful Mess tutorial here, but I will do a tassel tutorial soon! I feel like I've mastered them and will share a video as soon as I can! 

This is also a great time to figure out the color layout of your tassels and if you'll have enough for the space you're wanting to fill. 


STEP 3 : GLUE TASSELS TO THE BACKDROP.

This parts so fun! This is when all of the time you spent on making the tassels finally pays off and you get to see your weaving come to life! I can't wait to see the creations you come up with!

Tips: Make sure you spread out the tassels on the bottom layer, because the layers above them will "fill in dead space". My suggestion is to spread out the tassels on the backdrop and if there's too much dead space you may need to make more tassels. I ended up filling in a few areas at the end of the project. It's easier to go back in and fill in spaces than to not have enough yarn, so start out wider and fill in as needed. Does that make sense at all? Ha!! 

You'll only have to glue the top "ball" portion of the tassel. Everything else on it will hang loosely. 

Here's a look at the particle board I used as my backdrop too btw! (And Bella creepin on the comfy chunky yarn again)


STEP 4 : GLUE TOP FAUX WEAVING.

This part may take a few tries, but essentially you will either glue the felt balls down (like in their tutorial) or use chunky weaving and puff it up randomly to make a "weaving" look. It's really hard to explain in words, so hopefully this pictures shows you what I mean haha! 


STEP 5 : SECURE ROD AND STRING TO TOP.

Here's a closer look at the copper rod I used at the top of mine. Again, just hot glued it to the particle board! I then had Blake drill two holes on the sides of the weaving and I strung heavy copper electrical wire to the art! 


And here's the finished piece! I hung it in another spot to get a good picture of it with the girls, so you can see it styled a couple different ways! 


Andddd...here she is in her new home!!! I absolutely love it and keep smiling at it every single time I pass it. It's also the very first thing we see as we walk down the stairs in the morning!

Blake keeps saying "Amy, I love the new shag!" hahahah! oh, my life. ;) 


Happy crafting!

xx, Amy

BALLOON ARCH DIY TUTORIAL

The wait is over! My most asked for tutorial is finally here!!! Yippee!!! 

 
balloon garland tutorial copy.jpg
 

It's no lie that I have such a passion for celebrating people, and there's no better way for me to do it than create a backdrop and beautiful scene for their celebrations! 

I'll be sharing pictures from both Hadley's first birthday party and from a recent baby shower I hosted! I love that you can see two different color scheme options, but I also love showing you this because the exact same DIY method was used for both!!

Can't wait to see your creations!


STEP ONE: GATHER MATERIALS

  • greenery (i used eucalyptus leaves and silk flowers from Hobby Lobby)
  • staple gun (we used a staple gun because we are redoing the wall that I've been using for these arch garlands. We've also used heavy duty painters tape as well, but it's not guaranteed to stay up.)
  • balloons (I gather balloons from various big box locations like party city, walmart, target, hobby lobby, michaels and joanns, but I also love shop sweet lulu and etsy shops for more specialized colors!!)
  • washi tape (to cover the ends of the floral wire)
  • cloth floral stem wire (buy the heaviest gauge available and around 18" for length.  There are Hobby lobby, walmart and amazon versions available! Just google search "cloth floral stem wire" and many come up; I bought ours at our local Hobby Lobby)

STEP TWO: COVER FLORAL WIRE ENDS

  • for this step you will use your washi tape to cover the floral wire stems.  cover the ends of all the floral wires you plan on using. the length and number of wires will be based on the size of arch you need (get this measurement by laying them out along the wall to get a visual for how large you want the arch).
  • the purpose of this is to ensure that as you're messing with the wire (which is sharp) it doesn't accidentally poke and pop one of the balloons; it equally acts as a barrier for your skin too! 

STEP THREE: BEGIN TO TIE BALLOONS TO THE WIRE

  • you want to first use your limited colors.  If you are using a pink, red and white color scheme for instance, but you want pink to be the dominant color, I'd start with placing limited reds and white along all of the floral wires spreading them out evenly. then I'd go back in and fill in all the open areas with all the pinks remaining so that there's mostly pink in the arch.  similar to the blue and gold arch, I started with the gold first and then filled in with all of the blue. 
  • to tie the balloons to the wire, I didn't tie them off to themselves first. It's easier to tie them to the wire as you're tying the balloon off.  Does that make sense? haha! 

STEP FOUR: FILL IN ALL SPACES

  • add in all of the filler balloons (the dominant color) and lay the arch flat on the ground to make sure there's no open areas.
  • also remember that once it is on the wall, many of the open areas will fill in because the pressure against the wall will push the balloons out.  

STEP FIVE: STAPLE WIRE TO WALL

  • again, you may want to use another method that is a little less damaging to your walls. we are only doing it because it's a wall we are going to redo. BUT, if you can do it-do it! It's the best way to keep them secure! if you have a space that can be easily covered up by a large picture, then a staple gun will work!! 
  • you want to staple right above where you put the washi tape. 
  • once the wire is stapled to the wall, the best way to secure the wire is to wrap the end with the washi tape around the wire to fully secure the arch to the wall! that'll keep it from slipping or sliding at all! 
  • repeat this step with each end of each wire to form an arch on the wall.
  • we learned that it's best to do each piece in segments because it's much easier to work with the smaller sections. once you put them all together on the wall it'll look like one fluid piece! 

 STEP SIX: ADD FLORAL

  • once the full arch is on the wall, add in all of your pretty greenery and floral to make the arch come together! THIS IS MY FAVORITE PART!!! IT ADDS SOOOO MUCH! 
  • you'll have to mess around with different angles and placements until it looks the best, but feel free to use my pictures as inspiration for where you should place yours! I also use flowers and just stick them in between balloons to hold them in place! 
  • if the balloons are secured to the wall well (i.e. with a staple gun) you don't have to attach the flowers or greenery into the wall at all! mine are all just placed in between the balloons which hold them on the wall just fine! 

I canNOT wait to see what you all come up with! Be sure to tag us @theeverco and #theeverco so we can see and possibly feature it on the blog or IG!

Here's some pics from my instagram @amylouhawthorne from the two parties I made these for! I'm pretty sure they're my all time favorite DIY now! 


xx, Amy

SPEAKING THEIR LOVE LANGUAGE

This Valentines I've chosen to give more with less.


I'm a gift giver naturally, it's how I most comfortably show my love language.  But I've realized that not everyone feels loved the most in receiving gifts. And that's a hard concept to grasp! Our love languages aren't all the same, which is totally fine, but it can be a difficult concept for couples to figure out when we feel like we're desperately showing love and it's not being received. 

It's not only important to learn how you show love best, but it's equally as important to learn how your significant other receives love the best! Luckily, Blake and I have figured this out pretty well over the years and I know that while he may not need tangible gifts to feel loved, there's one tangible gift that goes straight to his heart.

And tummy. :) 


Food and sweets are the way to my man's heart. He got that sweet tooth from his momma. :) And while I may not be the best in the kitchen, I've learned so much from my mom and his mom over the years with recipes that they've handed down, and now I've become a self proclaimed chef! Now, I get lost in the kitchen (both literally and figuratively, ha!) but it's because I know just how much a good home cooked meal means to him. It's because I know baked goods speak straight to his soul.  His eyes light up at the smell of homemade apple crisp.  His smile widens at the sight of homemade cream cheese icing for his cookies.  He's such a foodie, so I've learned to show him love this way. 


You may have seen that I am transitioning out of Active Duty Army service to the Army Reserves this summer.  And with that comes a huge pay cut - a $6,000 one to be exact.  We've been revamping our budget over the last year, and have learned that happiness isn't found in our bank account. I've been learning that I don't need all the things all the time, and have mastered the fill the cart up but put it all back at the checkout line with one final pep talk with myself. (the cashiers hate me haha!)

So for the last year I've been strategically and diligently living with less, needing less, buying less and giving less.  Which honestly is super hard for me, because it's naturally what I love to do.  But I've realized that the decisions I make with our money now are going to have lasting impacts on our future. In the last year, we've realized the truth behind one cliche phrase after another.

 Money can't buy our happiness, but our memories can.

Hence, why we created The Ever Co. 


Writing is a lost art, and it's an art that my sweet daddy did such a beautiful job of teaching me.  I never want to lose the passion I have for writing, and I'm passionate about instilling the art of writing in our girls.  A handwritten note goes a long way. 

For Valentines I created these "I love you Most" printables (found here) for him.  All week long I'll bake tons of yummy goodies for him to come home to after work.  With each yummy surprise there'll be a card, and on the back a note that reminds him why I love him more.  A note that reminds him all the reasons that I fell in love with him in the first place. I've printed off a ton of these and have hid them all throughout the house for him to find throughout the week of Valentines, but also even long after! Cause I know just how much a note of love means when it's least expected.  There's something so special about the subtle surprise of words that pull on heartstrings. 

And now, I think we have a new Valentine's tradition. 


We're learning to live a more abundant life with less in our bank account. 

So we challenge you this Valentines (and for holidays after) to not necessarily go out and buy all the things, but to make something-create something-go somewhere, to do something that creates a tradition and that makes lasting memories for you and yours truly.  Sure they'll remember the coolest techy gadget, but will they remember a trip to the place your first met and a picnic even more? 

We challenge you to do things that have tons of meaning and make tons of memory.

I have a good feeling it'll be just as special. (your bank account will thank you too) ;)


With the printables purchase from our shop, you get all three of these designs for just $2.99 to print as many as you'd like at home or at an office store! We want to bring you affordable, modern + hip designs in all that we create! We guarantee you can't find these at Target. ;) 


Printables- you can find the printables here for just $2.99 in our shop! 

Our cookie cutters were found at Home Goods for just $3.99, but here's similar ones from Target for $8.99! 

Here's my all time favorite rolled sugar cookie recipe! 

Ingredients:

  • 1 1/2 cups softened butter
  • 2 cups white sugar (I use 1 1/4 cup and we still love them!) 
  • 4 eggs
  • 1 tsp vanilla extract
  • 5 cups flour
  • 2 tspns baking powder
  • 1 tsp salt

Directions:

  • In a large bowl, cream together butter and sugar until smooth. Beat in eggs and vanilla. Stir in the flour, baking powder, and salt. Cover, and chill dough for at least one hour (or overnight).
  • Preheat oven to 400 degrees F (200 degrees C). Roll out dough on floured surface 1/4 to 1/2 inch thick. Cut into shapes with any cookie cutter. Place cookies 1 inch apart on ungreased cookie sheets.
  • Bake 6 to 8 minutes in preheated oven. Cool completely.

Here's my all time favorite cream cheese frosting!

Ingredients:

  • 1/2 cup softened butter
  • 8 oz. cream cheese
  • 4 cups confectioners' sugar
  • 2 tsps vanilla extract

Directions: 

  • Beat softened butter and cream cheese until well blended.
  • Add powdered sugar and vanilla. Beat until creamy.

Happy baking and note writing, loves!

xx, Amy

DIY FLOWER CROWS

The picture that broke the internet. 

Just kidding.

Just a really cute pic I found on pinterest while spending an hour trying to find the perfect pic to announce this blog post tonight. So, I found a cow. And it may very well be my favorite picture of all time. But now to find this cow's owner and give credit where credit is due! If you find the source, let me know!

So here we are! I've been so excited to share this blog post on DIY flower crowns! Throwing a crown party is not only the BEST idea for a GAL-entines bash, but it's also such a perfect activity for a bridal shower, baby shower or other all ladies gathering! The whimsical, bohemian feel of them just makes my heart melt.  

Here are a few of my favorites (with tutorials) that I found today while spending 89,722 minutes trying to find the flower cow owner! ;)

This adorable one from Maker's Society! 

This gorgeous one from Delia Creates! 

This precious one + Rock My Wedding! 

Screen Shot 2018-01-21 at 9.30.51 PM.png

This darling one from Little Inspiration Blog! 

But wait, there's more! 

I am so excited to introduce you all to Marrissa and Amanda of The Wild Revival! 

We truly wanted to find blog contributors who shared the same passions as The Ever Co.  We wanted genuine souls who were on fire to build legacy and create tradition. 

And that's exactly what we found in these two ladies. 

The Wild Revival -21.jpg

Here's a small exerpt from their blog post on their DIY Flower Crown Gathering!         

"The heart + soul behind The Wild Revival Gatherings is creating a space where the walls can drop and real, honest conversations can happen.

This is about connection.

On the last Saturday of August, we finally held our first gathering: Flower Crowns + Food! It was amazing to see our heart’s desire come to fruition right in front of us.  It was an ideal end of summer soiree.

There were 16 of us at the event and we each brought something different to the table. Our stories are different, as are our struggles + our joys. We created, we laughed, and we engaged in conversations we wouldn’t have had, had it not been for the gathering. There is something to be said about what God does when He brings people together in that way."

“The heart of hospitality is about creating space for someone to feel seen and heard and loved. It’s about declaring your table a safe zone, a place of warmth and nourishment.” 

― Shauna NiequistBread & Wine

blogger-image-181247789.jpg

Honestly, I could not be more grateful that The Wild Revival are our very first EVER blog contributors.  I'm so grateful to be surrounded by women who encourage and uplift other women. Who cheer each other on. Who lift each other up. Who inspire.  

Thank you ladies so much for sharing your hearts with us and for GATHERING! 

Be sure to share your flower crowns with us on Instagram and tag us @theeverco ! 

Matthew 18:20 "For where two or three have gathered together in My name, I am there in their midst." PC: pinterest, source unknown

Happy crafting!

xx, Amy

NEW YEARS 2017

2017. We bid farewell.

Tonight we celebrated one of our favorite new family traditions. 

We decorated masks, made noise makers and marched up and down our neighborhood-making lots of loud noise-to the beat of our own drum. 

All with one goal in mind-to inspire others to celebrate life and remember the joy that comes in the morning. 

A few days ago, I shared this on my Instagram, but it was such an emotional tribute to this year that I wanted to share it again here.

I’ve watched Dancing with The Stars for over a decade since i graduated high school in 2005. I’ve grown up with the show. every year, every season, there’s one episode that i love the most. it’s the episode when every contestant gets to choose their “most memorable year.” some years are beautiful. some years are full of heartache. some years are a mixture of both. and in over 25 seasons, I’ve always wondered why I’ve never been able to say i had a “most memorable year.” until this year. 
2017 will forever be my most memorable year. . . 💗

a year of life. we spent our first year as parents of two. 
a year of redemption. the year i shared my testimony for the first time. 
a year of welcoming. we welcomed Blake back home from a nine month rotation overseas. 
a year of uncertainty. plagued with a roller coaster ride of health ups and downs for both girls.
a year of new. we launched The Ever Co. 
a year of change. i made the decision to transition from active duty to army reserves in summer of 2018. 
a year of celebration. the year i turn 31 on the 31st. 
a year of loss. on September 25th, i lost my best friend. my daddy. .

This year’s been memorable for so much God given goodness, but it’s also been memorable for heartache. . .

So here’s to 2018. here’s to hope for a better tomorrow. Here’s to living out my daddy’s legacy. Here’s to change. good change. And here’s to love. I declare 2018 my year of unfailing love. 


POST DETAILS: